Beautiful Driveway DIY for Affordable Curb Appeal
Our driveway was a long ribbon of ugliness–until we changed all that! We are loving this budget friendly driveway DIY with lots of curb appeal!
I’ve never tried to pretend like this blog is the ultimate resource for DIY and I won’t start now! But…I do have a fun DIY that we just completed and I want to share because while it may not be the very most exciting kind of DIY, it has made an INCREDIBLE difference in our curb appeal.
While there are many things that Robb or I could figure out and do, we tend to hire out the big jobs because, quite honestly, we just don’t have time! We both work full time and we really try to carve out time on our weekends for relaxation, rest, and most of all, time with our kids. (Ouch, we’ve got to do better about this; it’s been extra busy lately!). So when we can, we hire out the jobs we don’t have time for or that we know are going to be frustrating to complete with our schedules.
")
I’ve talked about this on my Instagram before, but I think it is important to set realistic expectations for DIY. You’ll find ALL KINDS of people doing ALL KINDS of DIY projects. I admit, I’ve fallen guilty to comparing myself before, thinking “we should be able to do this or that too”. The bottom line is that yes, you very well may be able to do any number of DIY projects. They can be challenging, rewarding, fun, and even an exciting learning process.
It is also completely okay to recognize that any number of DIY jobs may fall out of the scope of a realistic expectation, depending on your skills, schedule, and even well-being!
All of that being said, Robb decided to tackle this driveway DIY project himself. I stayed far away and tried to cheer from the sidelines!!!
Our Project
Operation Driveway DIY
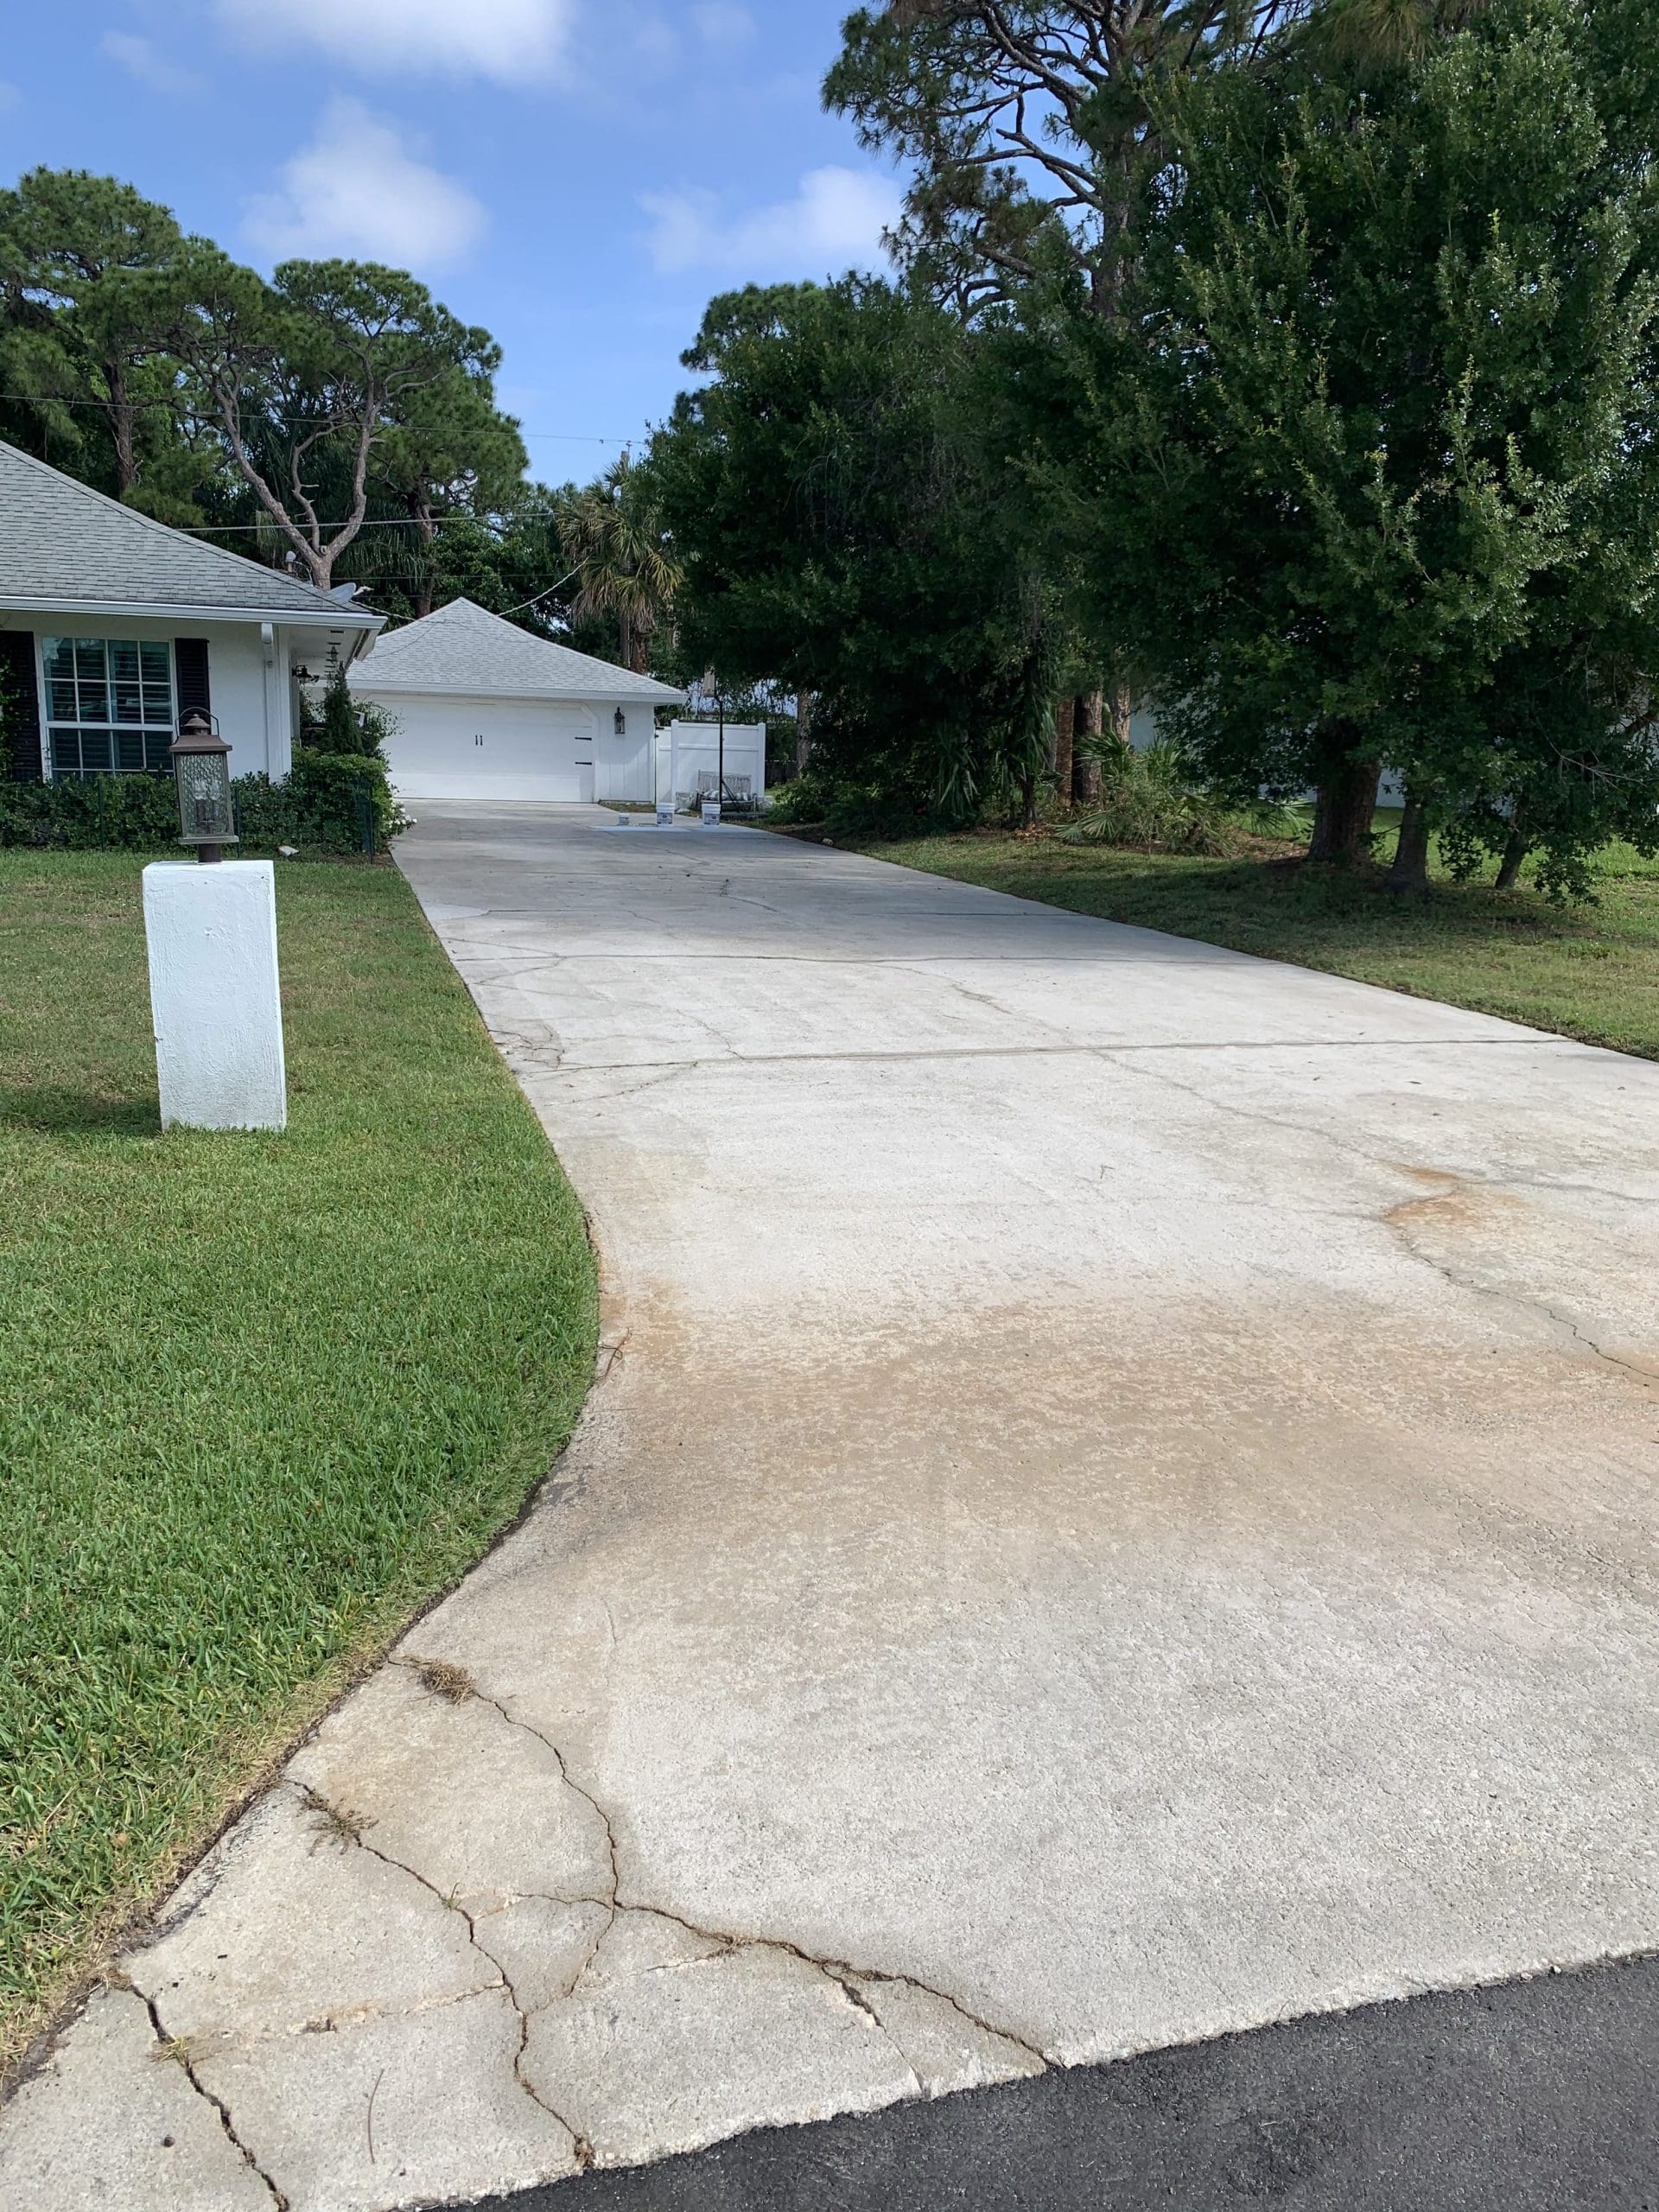
We have the longest and ugliest driveway in our neighborhood, no doubt. And ugly as it is, it was a huge selling point for us! I love that there is plenty of space for the kids to ride bikes, roller skate, play basketball, set up corn hole or ping pong, and so many other activities. I also absolutely love that our home sets back just a bit. While that is common for my northern friends, it is harder to come by in South Florida.
")
So we had a fun driveway…but it was still ugly.
Sooooo many cracks and discolorations really made it an eyesore, but I didn’t even realize how bad it was…until it started getting good!
Driveway DIY: Painting versus Resurfacing
The optimal solution would have been to bring in professionals to completely resurface our driveway. Some quick research told us that it was going to be WAY out of the budget, especially for something that is purely aesthetic.
At some point, way down the road, we may still save up and have the driveway resurfaced. I can imagine concrete stamping with a pretty brick lay or stone pattern…but over 100 feet of driveway and our budget don’t match.
")
Realistic expectations, remember?
In a casual conversation with a family member in the concrete business, it was suggested that we “just paint it.”
Driveway DIY: Prepping the Driveway
Step One: Powerwash
We spent about $150 to have a local guy power wash our driveway. Since we do not own a power washer, this was a cost-efficient and time-efficient solution. Our driveway is also quite large and very long, so you likely would not have quite as much expense!
TIP: Spray weed killer a few days prior to pressure washing.
")
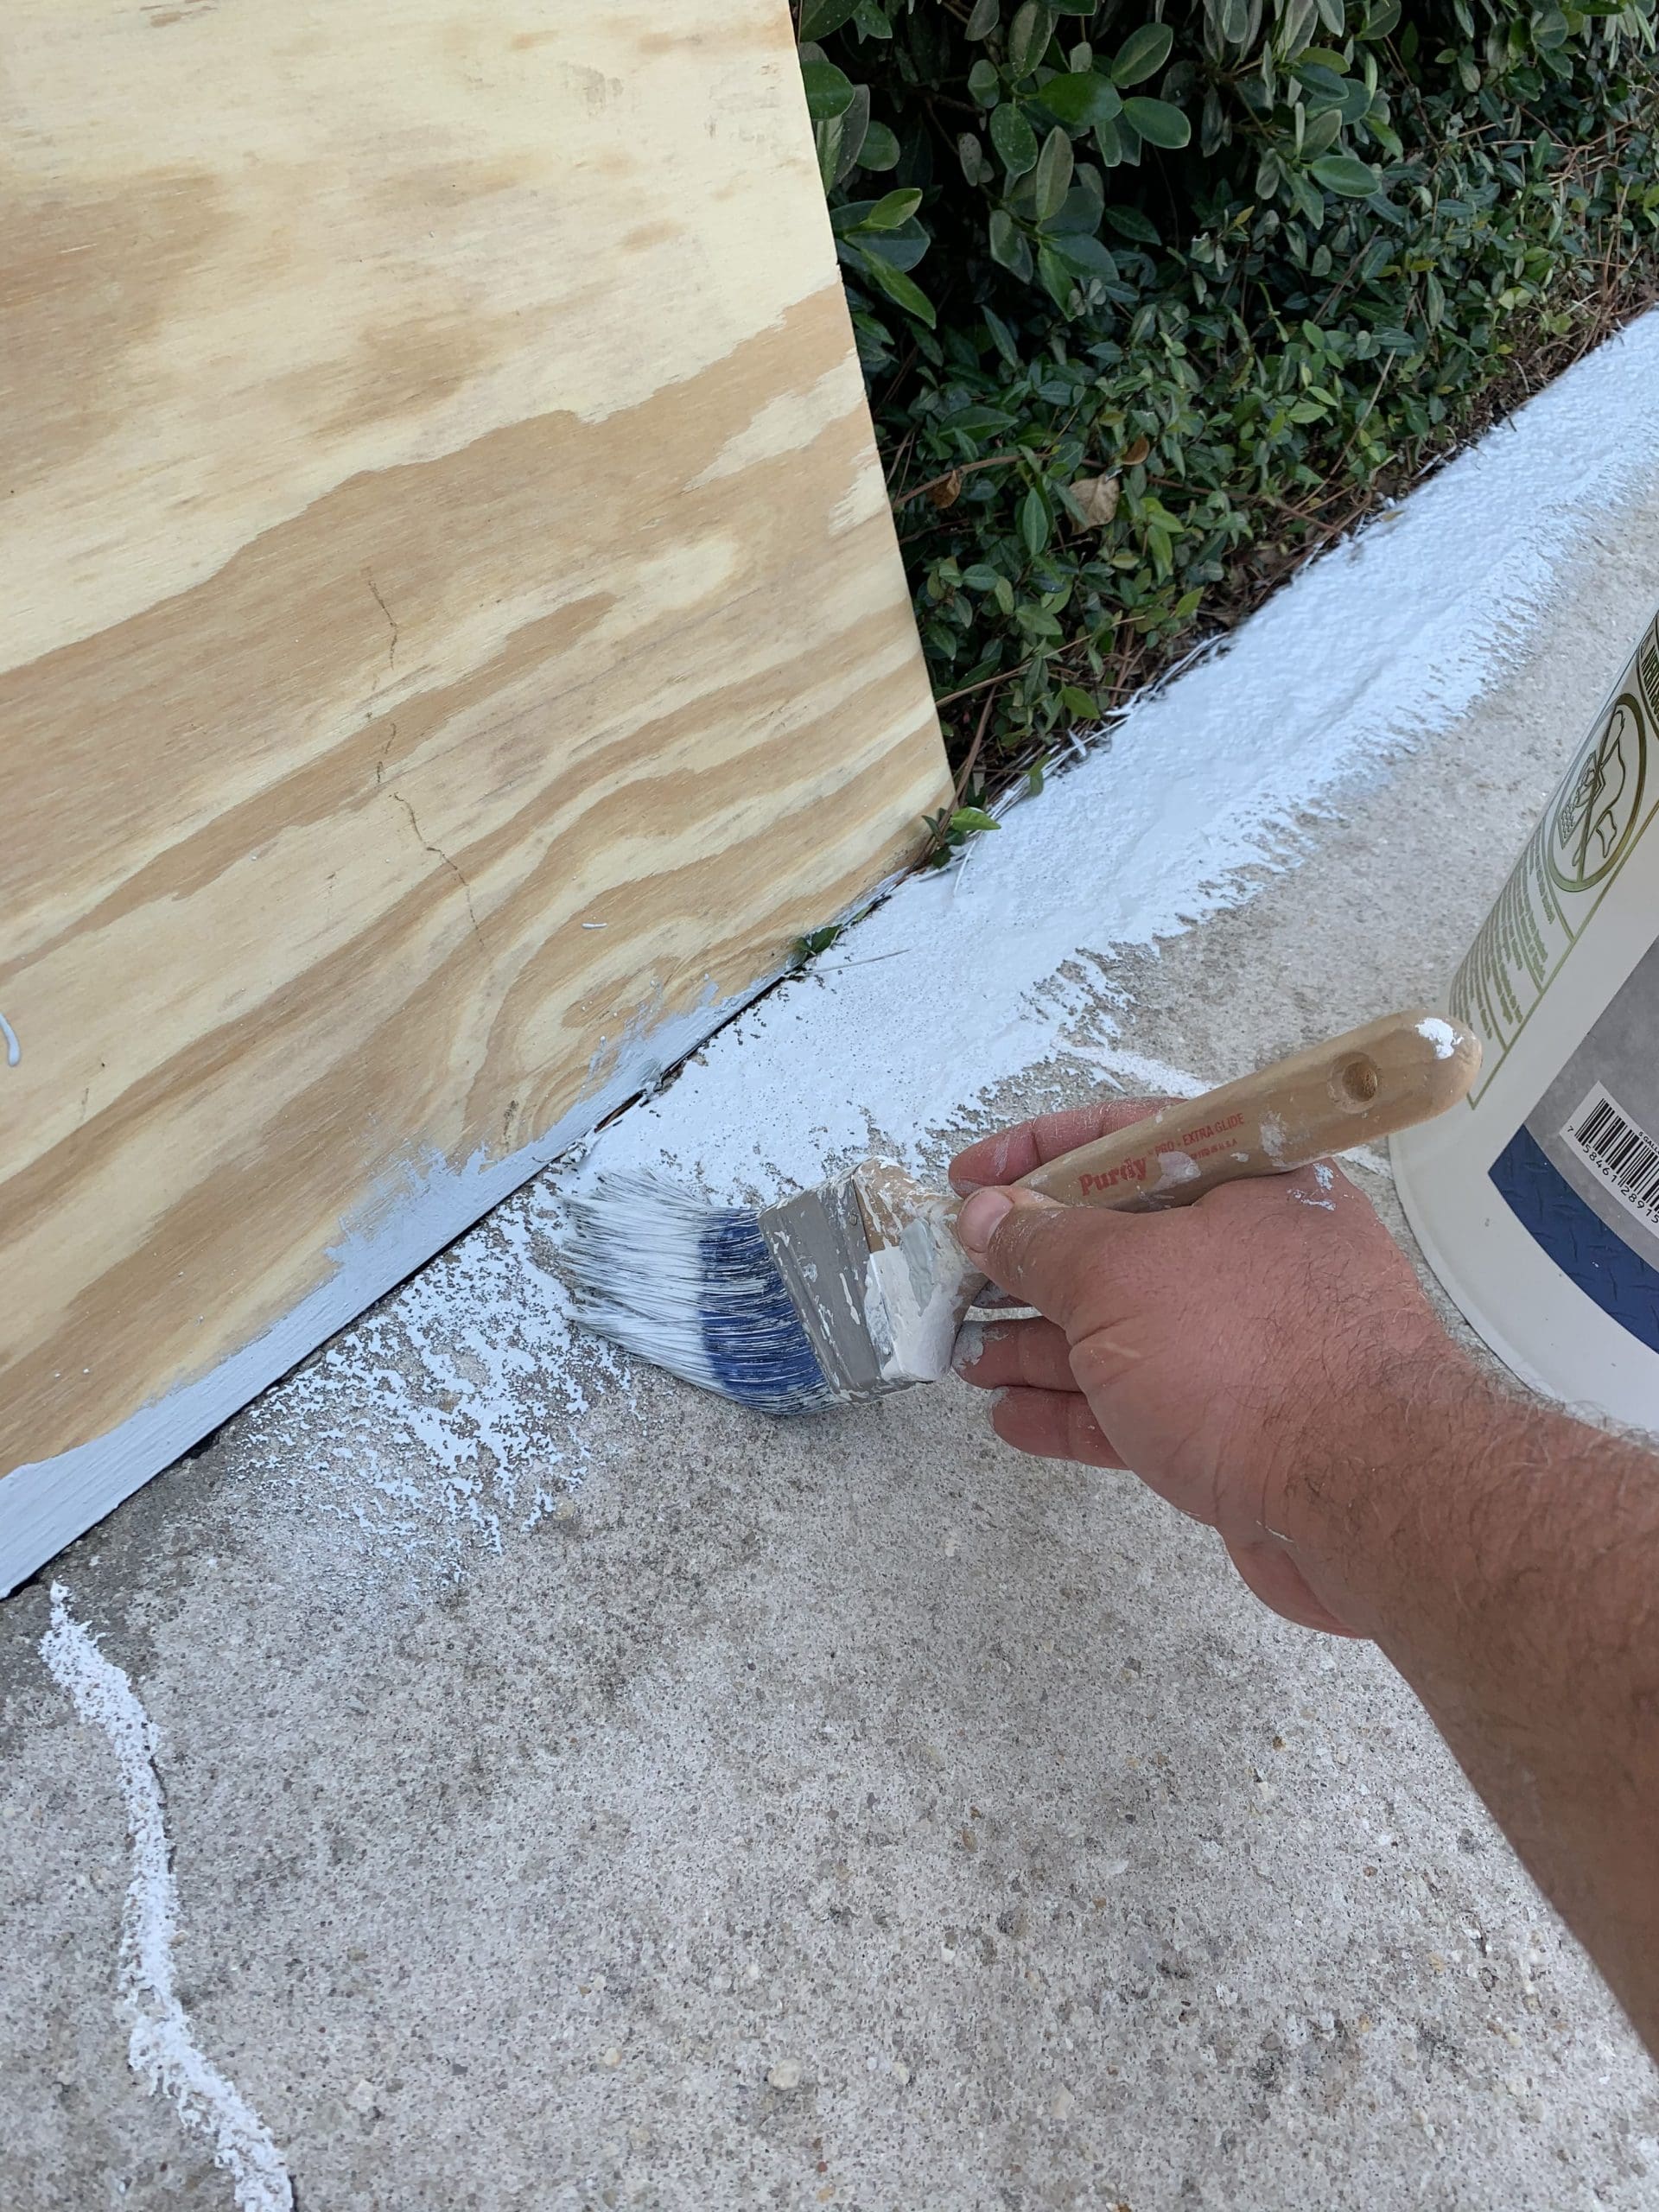
Step Two: Caulking the Cracks
This was definitely the most grueling part of the project, as our driveway had lots of cracks. Hopefully your driveway doesn’t require quite as much of this hot, tiring work! Here is the process for prepping the surface for your new coating:
")
For smaller cracks, a tube of caulk will work just fine. However, as our project got going, we soon realized that most of the cement cracks were too wide for this application. On to Plan B!
")
For most of the driveway cracks, we found applying the caulk with a putty knife from a tub worked much better. We found that it’s very important to “pull” the edges tight with the knife or even your finger. This leaves a smooth edge and doesn’t translate through the coating.
If the caulk drives unevenly, it’s difficult to brush or sand them smooth. Don’t ask Robb how he knows!
")
Coating the Driveway
There are so many options for colors. We wanted something light and bright and while white is usually my go-to, we opted for a very light gray. After applying some samples, the white seemed a little too glaring and the darker gray felt a little too “silver”. The color we chose was Behr “Foggy Morn”, which Sherwin Williams matched perfectly.
TIP: Always take a helper with you to pick up the paint!
")
When choosing your driveway paint, the options can be overwhelming. Paint, stain, epoxy, coatings, sealants–ask five people, and you’ll get five opinions!
We considered a stain or epoxy paint for our driveway. A stain would have looked good, but wasn’t as durable as we wanted. An epoxy would also have worked nicely, but the sheen was a bit too glossy for our taste.
We ultimately decided on a coating product, Duraplate 289. It’s designed for driveway applications, and is fully tintable. It’s the perfect blend of function & curb appeal!
TIP: To save $$, open an account at your paint store. New account promotions can save 40% or more on your supplies!
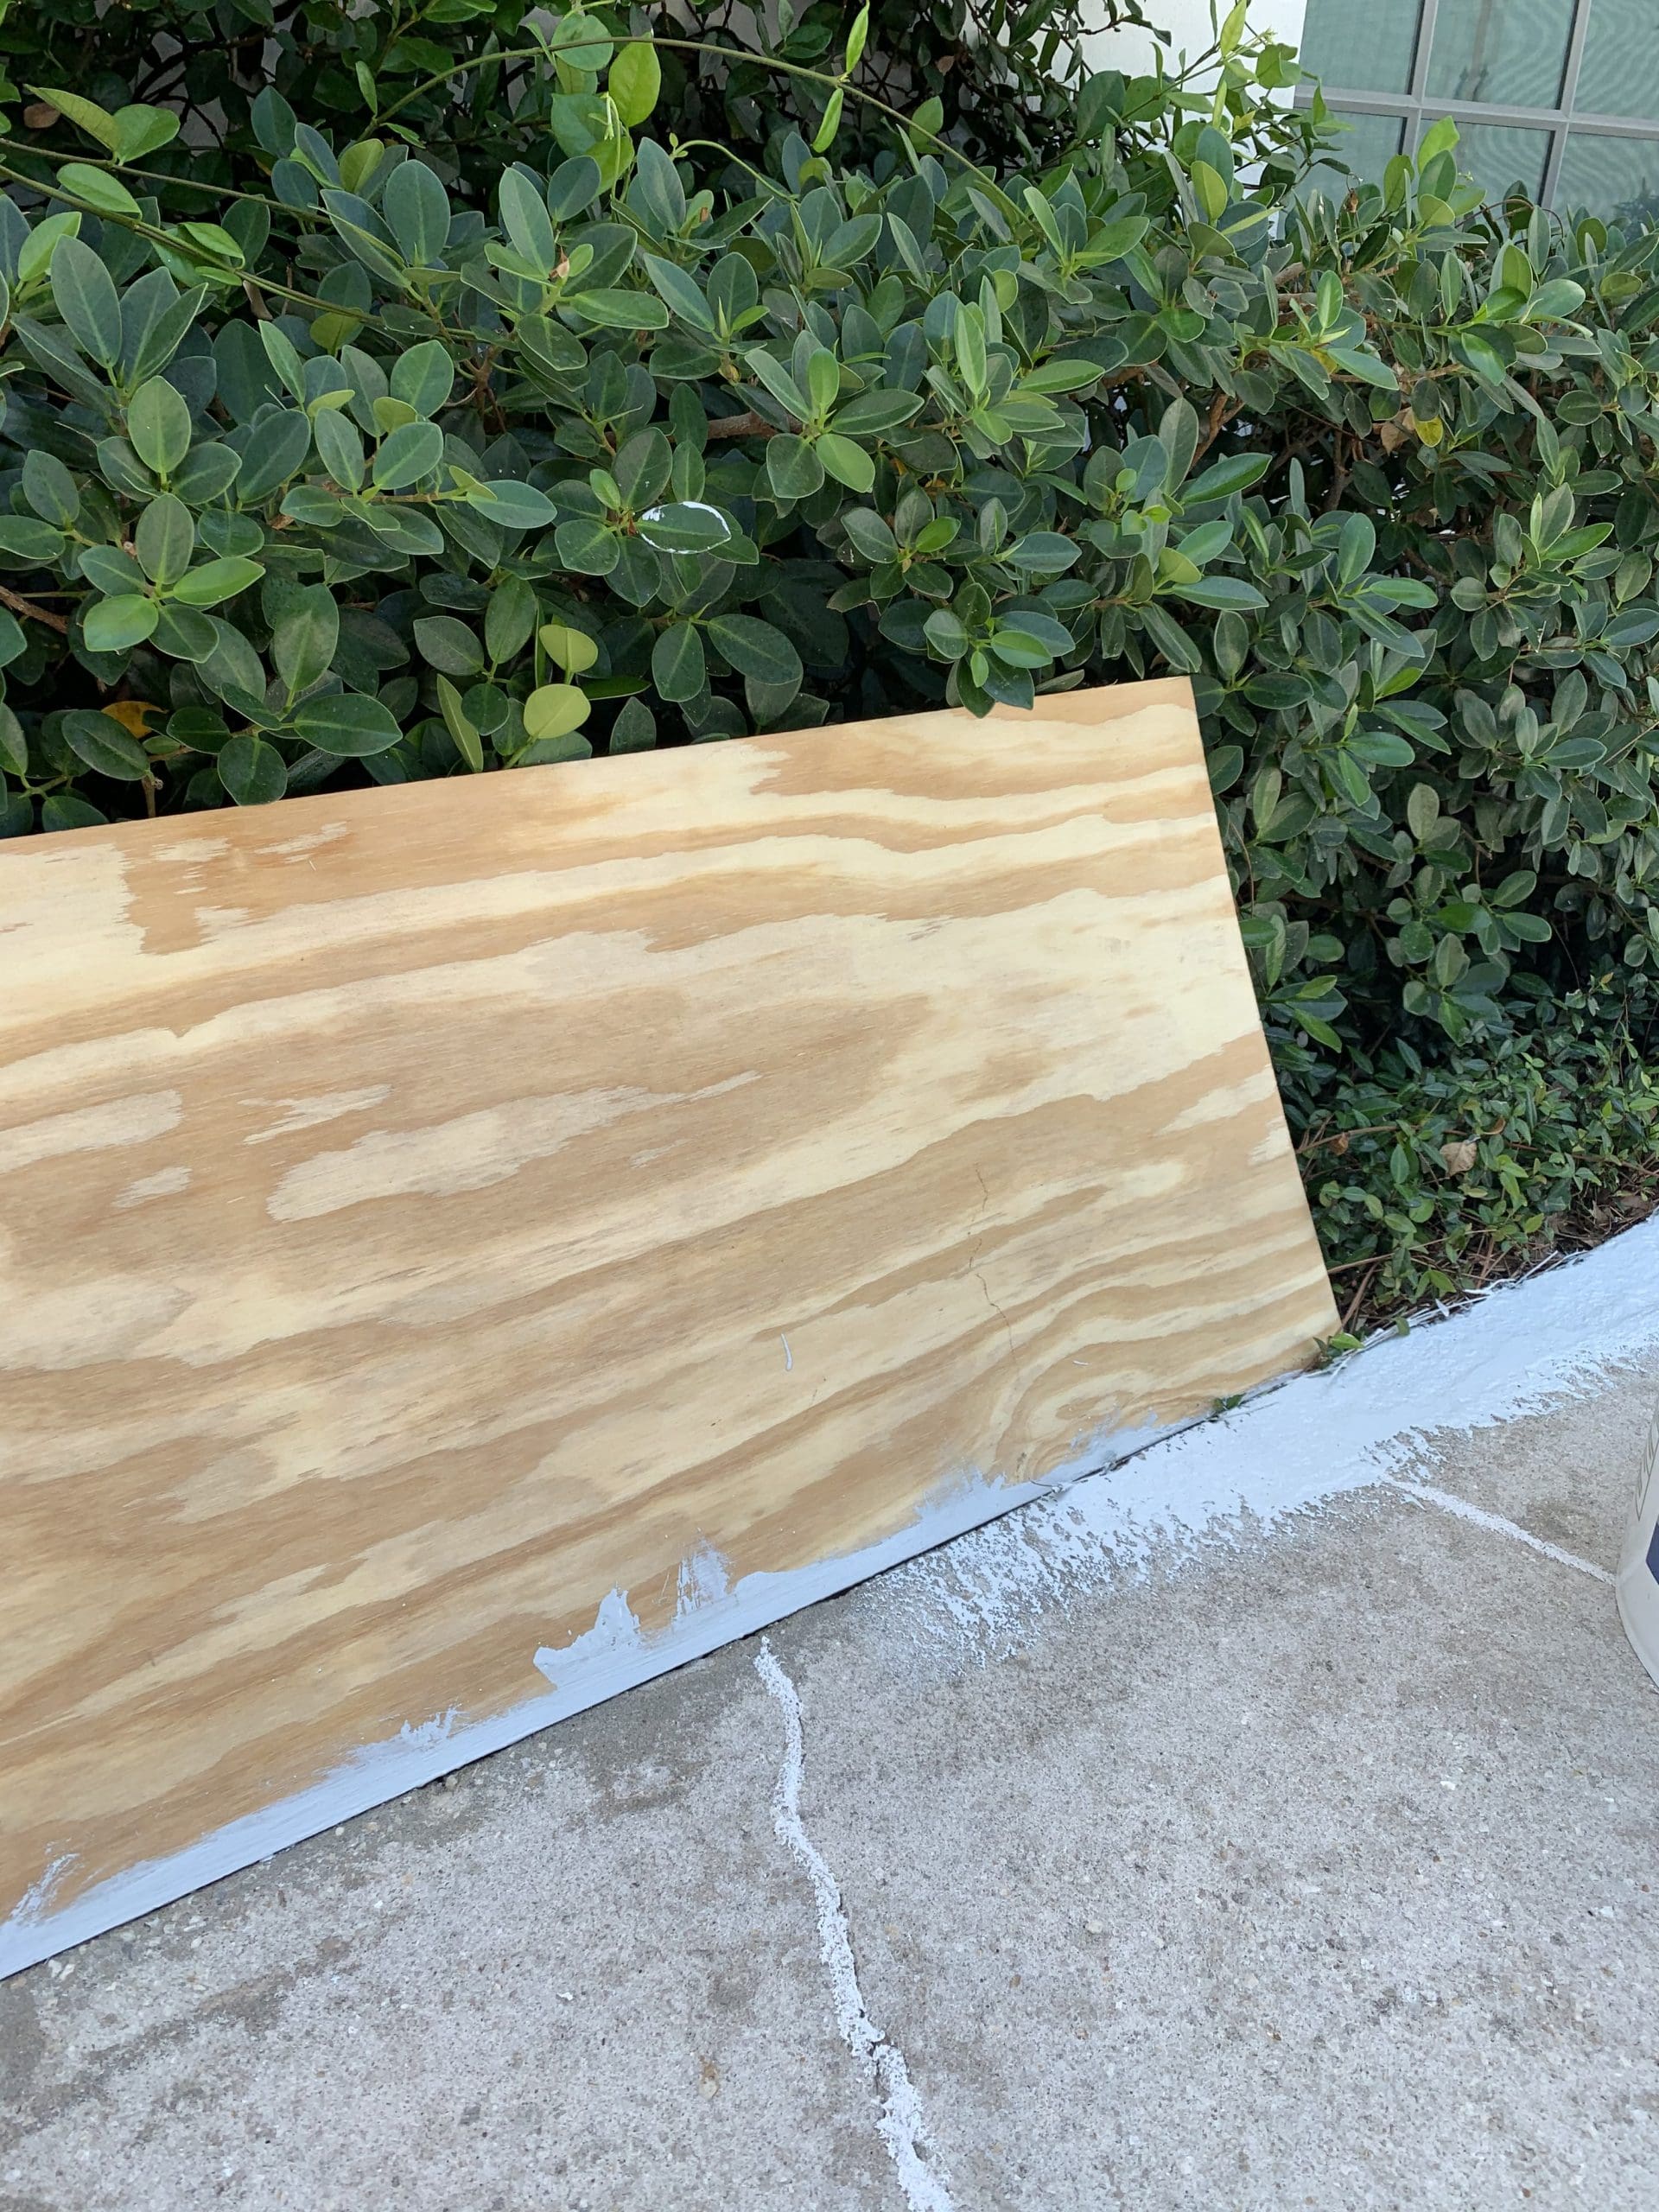
One quick note: NOT painting the grass can be a challenge! Robb found a scrap piece of light plywood to use as a buffer to “cut-in” the edges. If you don’t want two-toned grass for a few weeks, this works great!
The difference between the old driveway (even power-washed) & the newly coated area is amazing! Now, I don’t know why we didn’t do it sooner!
")
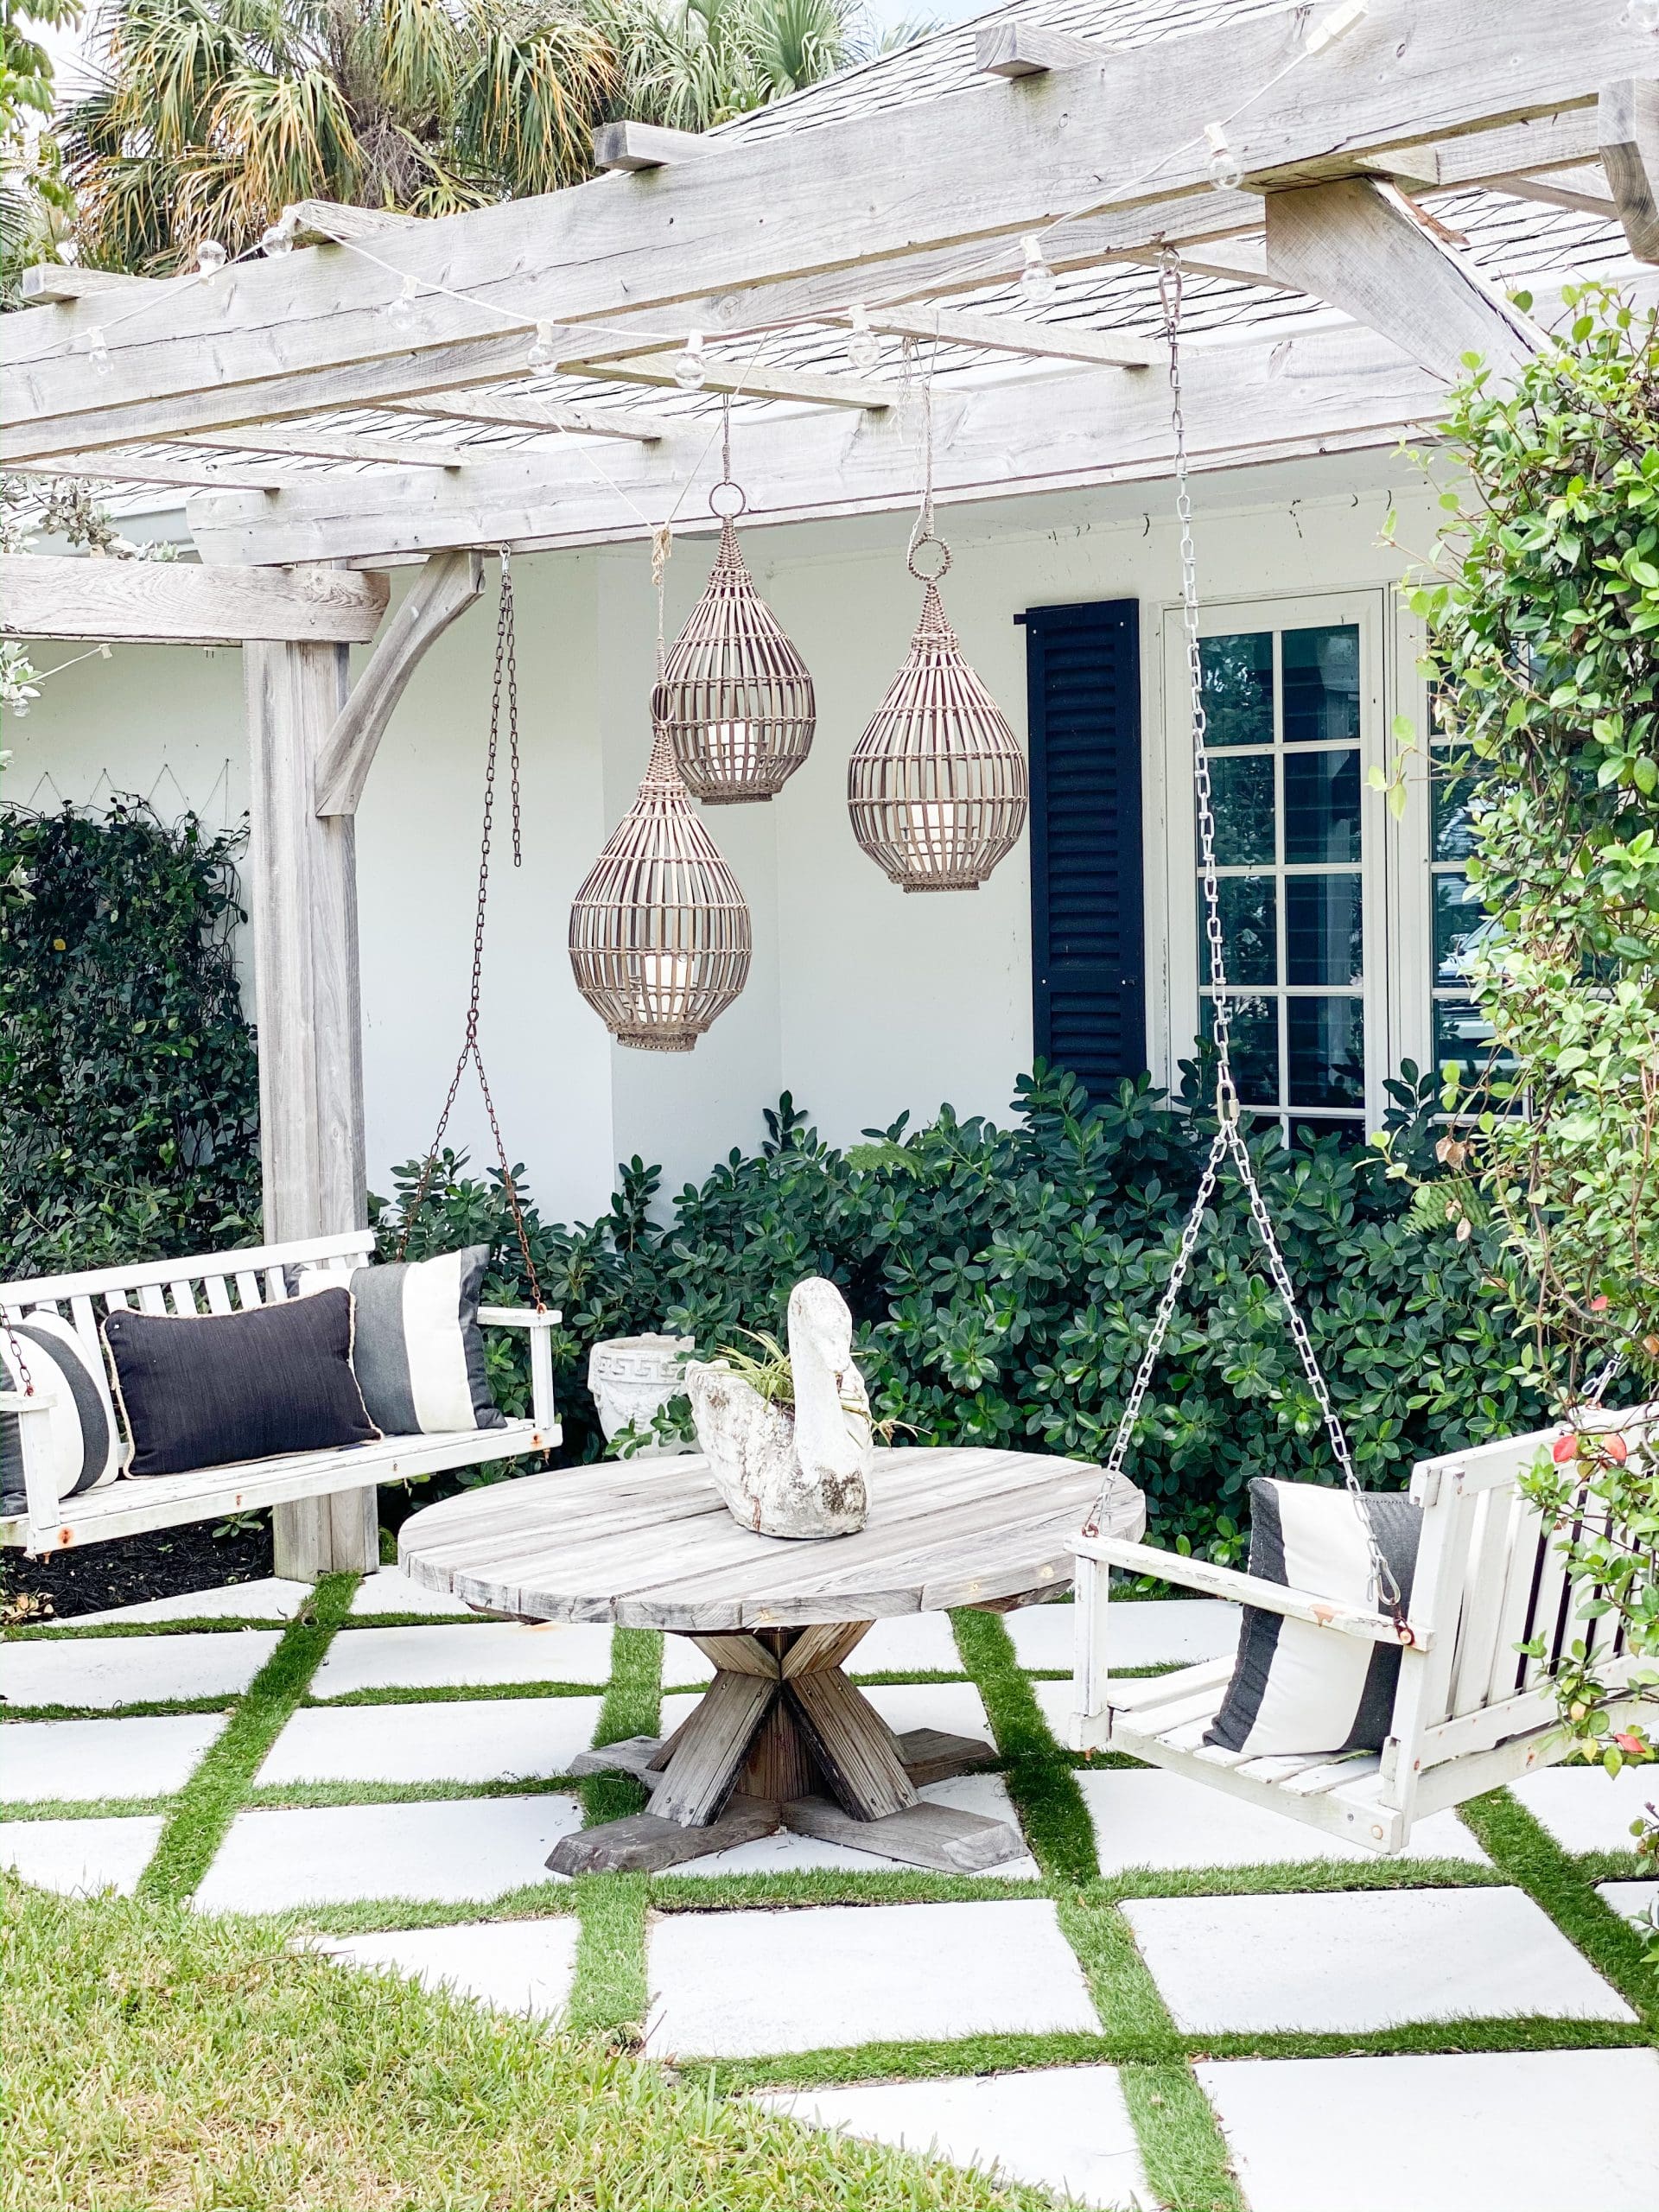
Finishing Touches
Have you ever had a project that you were so excited about and it snowballed into lots of other little (or big) things? The driveway was that kind of project for us! We planted new flowers, using white Vinca and a type of flowering jasmine (this time, making sure it is a variation that our neighborhood rabbits won’t eat!). We laid fresh black mulch to tie in with the black shutters and black front doors.
")
All of that, of course, led to a few additions to the front porch! We cleaned our striped outdoor pillows with my favorite fabric cleaner and they look good as new! I added these round, fringed pillows for a little summer vibe.
")
We put fresh plants and flowers in my favorite Walmart basket planters. I actually ended up purchasing two of these sets because I love them so much. Now, we have some for the front porch and the outdoor living space in the back! We cleaned our white rocking chairs and Robb painted the porch a nice, fresh, bright white.
")
For the first time since we purchased this home and started renovating it, I can pull into our driveway without a long list of “we should do this” forming in my brain!
")
What outdoor projects are you tackling this spring?
Blessings,
Robyn

Gallery


Wow! How amazing! Rob did a great job!
Looks so good!
Once again, you are saving us. First it was your paver with turf idea, now paint for our car port. We’ve power washed and laid area rugs but this should make me like this seating area again. No we don’t park under carport…
Thank you.
Wow!!! Robb did an AMAZING job!! Great painting you two! Your little piece of paradise is looking soo good.
Robb is the man! Great job. Thanks for info, it’s definitely a doable project and looks amazing!
Wow!! What an undertaking, that is a lot of driveway and Robb did an amazing job!!!
Wow. It looks so beautiful. It is so amazing what a little fresh paint and driveway coating can do to make your home look refreshing. You both did an awesome job. I love it. Job well done !!!
Your Driveway looks wonderful … beautiful front door entryway design adding planters, pillows, fresh-painted rocker, white flowers, and mulch… You must be very happy as you begin your Summer. Enjoy!! Susan
Fabulous! Looks like a huge project, but well worth it.
What a transformation! Well done!
OMGosh! Great job Rob…. it looks fantastic!
That turned out amazing!!!
Wow! Unbelievable difference! Great job to both of you! Robyn, I’m sure you were the “ideas” behind this project and, Robb, I know you were the muscle!
Wow! Everything looks even more beautiful!! Lots of hard work! Great job!
Beautiful job! What an amazing difference!
Wow Robyn what a transformation and this was a Great tip and way more budget friendly way then like you said resurfacing the whole driveway! Love love love the front porch, and those pillows really brightened the space up and made it feel like Summer!!
Awesomesauce! it looks marvelous!
What a great job! This is unbelievable????????
It looks so clean, bright and beautiful! Your home is absolutely lovely!
Beautiful Robyn! I love everything you and Robb have done with your home, inside and out! You are so blessed to live in Florida! God bless you and your fam!
Missy Duffy
CA
My thought is how is it holding up?
Great job, Robyn! How long ago did you do this? How has it held up to the Florida heat & humidity? We just moved here & I’d love to do the same with our driveway.
Hi there, Frances! It has held up beautifully for us. We updated it in 2021, and couldn’t be happier with it!