How To Make Easy, Inexpensive DIY Curtains
")
*As an Amazon Associate I earn from qualifying purchases*
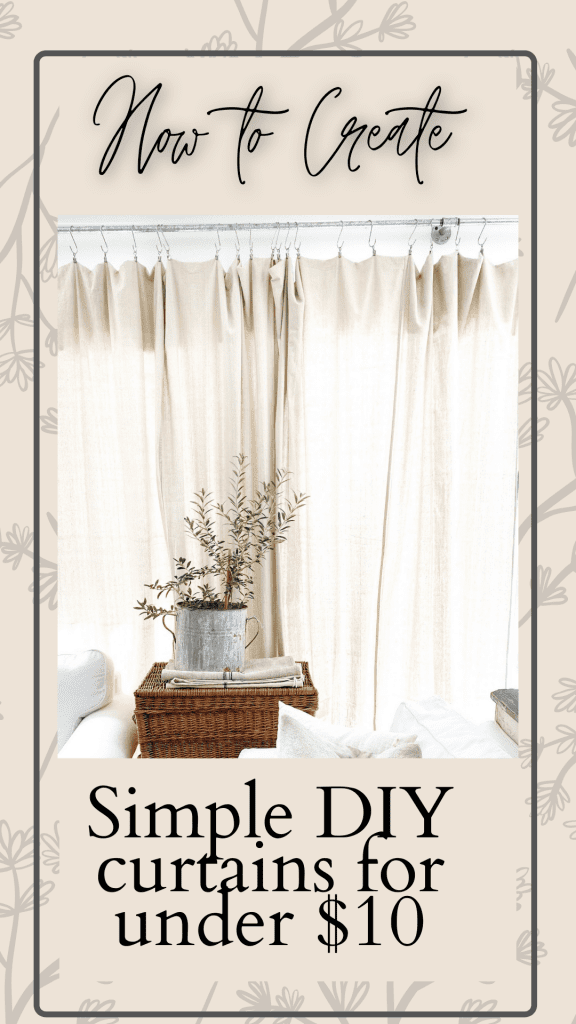
Check out how to make these budget-friendly, no-sew, DIY curtains! Skip the expensive curtains and create your own in a couple simple steps!
Does anyone else have a permanent curtain frustration? It’s one of my least favorite things to choose for our home.
Quality curtains tend to be very expensive and to be honest, I don’t even love the thought of covering my windows. I love for our home to be bright and sunny!
However, curtains offer some benefits that can not only enhance the overall look of your home, but can be essential as well!
My Design Challenge
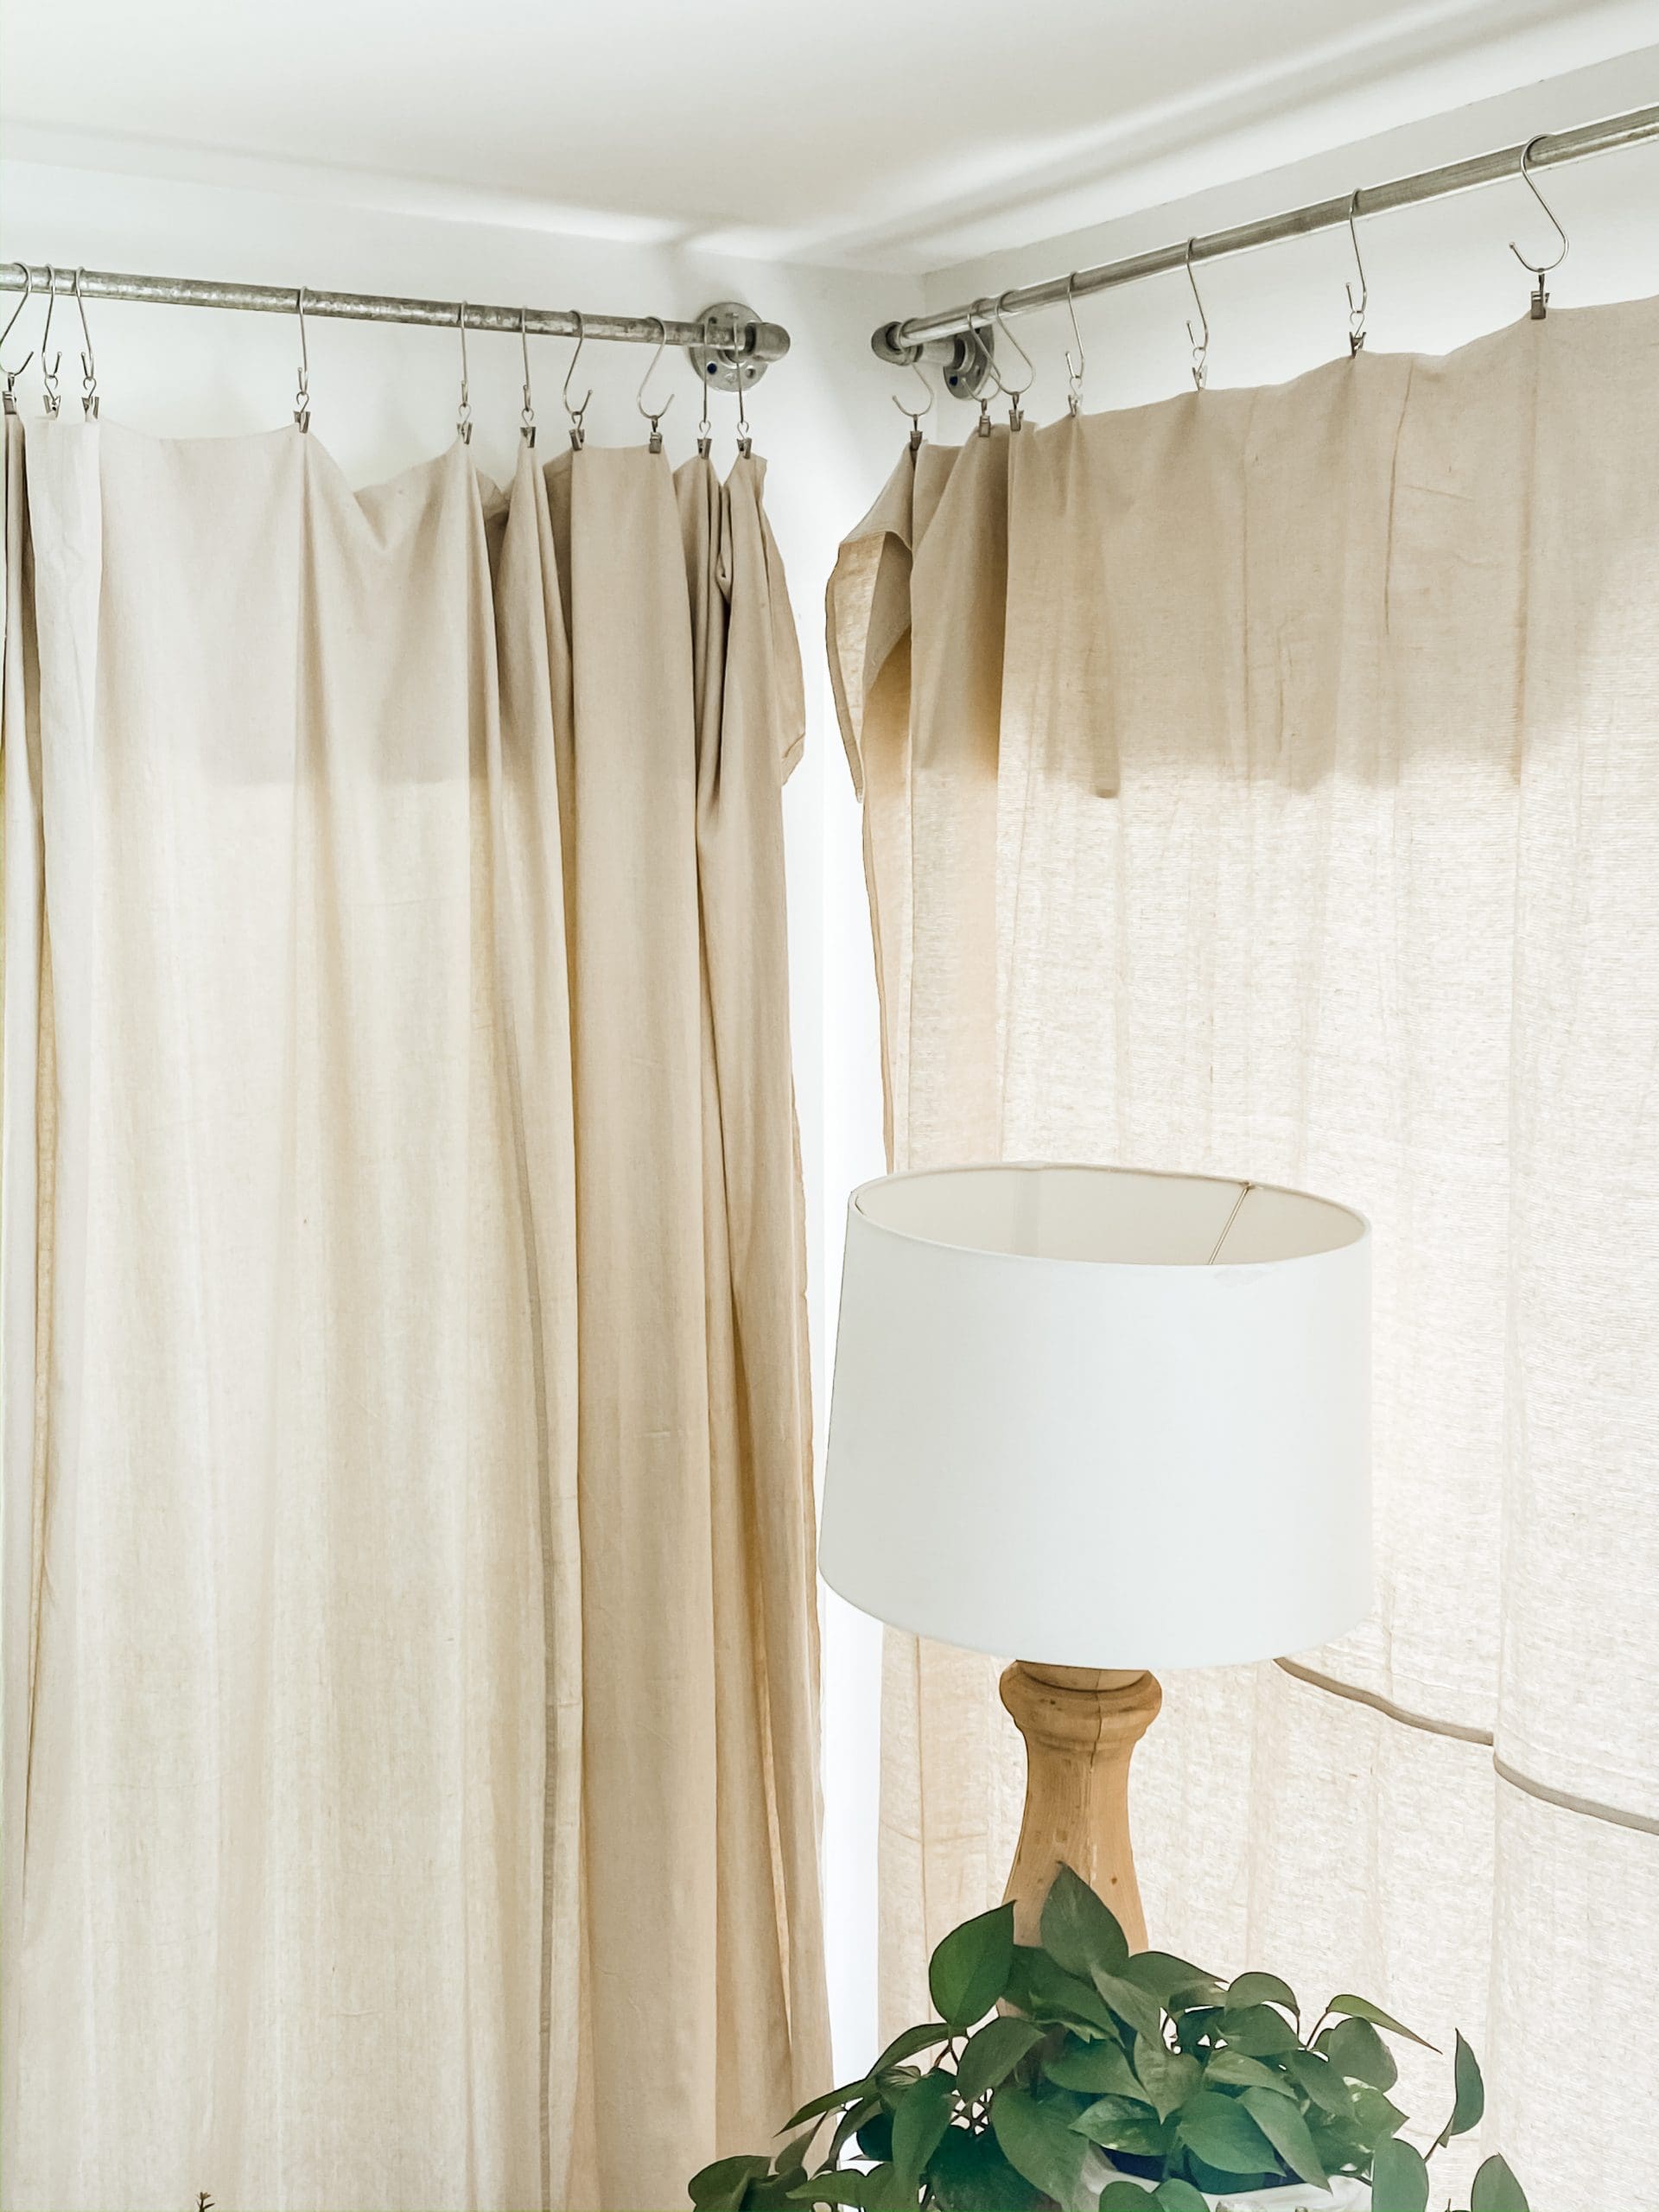
When we purchased our current home, there were a number of design challenges. One that was particularly tricky is the V E R Y long room that runs along the back of our house. All 48 feet of it, to be exact! That includes 48 feet of sliding doors that open to our pool and patio, along with about 12 feet of windows on one end.
We wanted to make this huge space feel like a cozy part of our home rather than an air-conditioned porch.
I immediately knew I wanted curtains to help break up those 48 feet and also soften up the entire room.

My Design Solution
Realizing the incredible amount of curtains that I would need, along with the incredible budget that would accompany them, I decided that DIY curtains were definitely in order!
I had used drop cloths to create inexpensive curtains around our patio at our old house, so I knew I loved the look (and price!) of them. I also loved the fact that this wouldn’t take a lot of time, effort, or expense, but would make such a huge difference in the look and feel of the entire room.
")
Process for Making DIY Curtains
Materials Needed:
- Painter drop cloths
- S hooks
- Clips With Hooks (heavy duty is best)
- Tape measure
- Step Stool
How to Hang Your DIY Curtains
Before ordering your drop cloths, determine the length and width that you need for your DIY curtains. Since I have such a long and large space, I ordered drop cloths that are 9 feet long and 6 feet wide.
Since my ceilings are actually only 8 feet and the DIY curtain rods are a few inches from the ceiling, we needed to shorten the length just a bit.
Insert fun fact: I do not know how to sew.
*Inexpensive painter drop cloths aren’t necessarily sewn with great precision, so you may need to adjust a bit and just know they won’t always be perfectly straight!
If you know how to sew or have a friend who is willing to do you a favor, you could also trim the drop cloth and have it hemmed to your desired length. If you prefer a more finished look, that would work really well.
Personally, I kind of love the imperfection of them. The texture and imperfection of the drop cloths reminds me a little of old European linen. Much like the shop rags that I love using for napkins, the drop cloths have that bit of a loosely woven fabric and texture, similar to linen.
")
I know, I know. My DIY curtains are a long stretch from fine European linen, but they fit my budget and I actually love them! The more expensive of drop cloths that you purchase, the higher quality. I prefer the more inexpensive ones because they are thinner and I think they have more of a “vintage linen” look for a DIY curtain than the really thick, expensive drop cloths. Again, just my personal preference!
The next step is to actually hang your DIY curtains! Simply put the S hook over your rod and then hang your curtain clip on the S hook!
Tada!!! Your DIY curtains are really that easy!
")
DIY Curtain Rods
Looking for a budget-friendly DIY curtain rod?
I knew the curtain rods for such a long space were going to not only be costly, but hard to find thick, sturdy ones (without breaking the bank) that would hold up at such long lengths. I also wanted it to be one, continuous rod for the length of the room.
Forty-eight foot curtain rods don’t really seem to exist. Ha!
I also love a bit of a raw, industrial look, so my dad helped us out with this project. Remember, we were currently in the middle of renovating almost our entire home. It was all hands on deck!
If you’re looking for a unique curtain rod, check out this DIY!
")
It’s helpful to have a second set of hands to install the curtain rod, but the steps themselves are fairly simple:
- Attach two flanges to the wall at a 10 foot interval with screws or anchors.
- Screw a tee or elbow fitting on either end of one section of pipe (an elbow for the end of the rod, or a tee for the middle)
- Hold up the pipe, and screw in the connector fitting between the flange & elbow or tee fitting.
- Repeat as necessary.
Other Spaces to Use Your DIY Curtains
We use these same DIY curtains, S hooks, and curtain clips outside under our gazebo! Outdoor curtains are crazy expensive. I love that these really help our gazebo space feel like a room but cost under $50!
We used thick rope to tie them back to the gazebo columns. That helps them not blow around in the weather, etc.
And for $10-12 each, it is not a big deal to replace them every few years when they are getting worn from the sun and rain!
I have also seen drop cloths used many times for recovering chairs or cushions for deconstructed furniture. In fact, the settee in our dining room has thick drop cloth-like material on it!
")
I hope this gives you some fun ideas! Remember to utilize textiles from the hardware store for inexpensive and fun DIY projects throughout your home!
")
Blessings,


*As an Amazon Associate I earn from qualifying purchases*
Gallery


I love using drop clothes for so many projects and have made curtains before too! Did you pinch and clip the back to create pinch pleats?
We didn’t, but that’s an easy option for sure.
Robyn
Buying curtains would have been really expensive and these look so pretty. I like the rod idea too. Thanks and have a great day.
You’re so welcome! Thanks for your kindness!
This looks amazing! The curtains are a wonderful and easy DYI for those of us who don’t sew. I was wondering what the long view of your original 48 foot long porch looks like now?
If I had to sew my curtains, I’m afraid we wouldn’t have curtains! I don’t know if I’ve actually shared on my Instagram a picture of the whole room. It’s kind of hard to get the whole room in a good shot!
Robyn.
Love these! I have these in my family room and absolutely love them. Thanks, as always, for your inspiration.
Thanks Leslie! You are always so supportive!
Robyn
You always give very clear and concise instructions that are so easy to follow! Thank you!
Thank you so much!
I have a screened in porch that gets filled with pollen during the growing season. Do you think that these would be good for that? Can these be dyed?
Are the drop cloths machine washable? If they are do you usually wash them before you hang them up?
Yes they are! I don’t usually wash them first unless they’re really wrinkled.
Robyn
I love this! I did something very similar with the curtains in my last home. I had two big window areas to deal with and almost no budget. I was lamenting to my husband one day that I couldn’t find any curtains that I liked and I just wished they made curtains that felt like my sheets. That set off a lightbulb and I bought a couple of big packages of white king flat sheets. And I bought a curtain rod system from Ikea that you can connect together to make longer curtain rods. I have used the idea so many times now. I’m going to keep the drop cloth idea in the back of my mind in case I need it sometime.
That’s a great idea! We really love the drop cloths for that space. I’d love to hear what you think if you ever decide to use them!
Robyn
Soon we will move upnorth n live in a used mobile home in the wood n will use dropcloth for the window n homemade industrial rods.
Thank you for this idea.
I love the look of your curtains. So cozy. Dropcloths are the best deal ever in fabric. The texture and color are so natural looking, which I like. You did a great job and so budget friendly.
Love how it all came out; one question though – where did you find those S hooks? I have been looking for them for a very long time and while I’ve found other types of S hooks, those are the ones I really want. They are huge. Thanks